2009-09-15
apple - not everything is lost (homesharing, audiobooks etc)
I spent a lot of time doing stupid stuff again and again and suddenly I google a bit about the things that take time and there is a solution:
itunes9 homeshare -> first I thought great -> then i noticed that it just imports duplicates on the other computer but then I found out that there is a view option on the bottom where you can set it to not in my library or so!!!!
audiobooks - i hated that I had to store all those audiobooks etc in musik and could not use another category but this is gone (actually since itunes 8 or so). Just right click information and go to options and set the type to audiobook, select skip when ... and keep position
album covert: album artwork asistant, nice
2009-09-11
Windows XP Mode on Computers with no VT
I own a Acer 5630 with a good CPU that contains Intel VT and X64 extensions but Acer decided not to give me the option to enable it.
So here comes Windows 7.
I cannot install 64bit but I really wanted to take advantage of 4GB RAM and 64bit is the way to go anyway.
I installed Windows 7 RC? and then downloaded vpc rc and windows xp mode rc.
When I tried to create a new VM or wanted to start XP Mode only an ERROR messages was displayed and I shall check my cpu and enable virtualization. As I said this model from Acer does not allow this and I haven't found out how to hack the bios settings to enable this.
But Virtualbox just works fine and I don't care about all that speed, my need is just to get windows xp for certain old applications.
Next thing I now is that I have to try to use the Windows XP Mode vhd to boot up in Virtualbox.
1) C:\program files\windows xp mode rc\.vhd
2) elevated cmd prompt: takeown c:\.......vhd
3) icacls ......vhd /grant myuser:F
4) remove read only attribute of file
5) start the virtualbox and create a new machine, import .vhd to library first and then start it
a mini setup will run
and ask you all the regular questions.
Also in my case it asked for a video driver and base system. Cancel those.
The system is then ready and only the 2 drivers mentioned before show up in devmgmt.msc as not correctly installed.
Internet works from the start. Machine looks to be fully funtional. (Virtualbox 3.0.6 used).
side note: I can only hope that the guys from virtualbox make a better seamless mode it's not nice, missing is the integration like in fusion, parallels or vpc.
After this I tried guest additions and since I felt really great I enabled the 3D accelation for fun. (Did a snapshot before that).
Worked like a charm. The only thing was to click enter when asked for administrator password which I left blank intentionally.
Ok, now activation. I DOESN't work. it did not accept it. there is a key provided in the machine and since the hardware changed you'll need to activate it and this seems to break and the key is then gone.
Update: I just switched back to my snapshot and did not install anything and tried to install updates. no luck either. Activation does not go through.
Good that they did this, bad for those people like me that bought a stupid machine where VT cannot be enabled.
When I bought that notebook I especially took care that the processor I buy has the features for x64 and vt but no one mentioned that the bios has to have this setting. I did not think that it should not be there because on my thinkpad the settings were always there.
Ok. Now maybe has another solution to my problem. running vpc without vt would be ok or getting that bios fixed.
;(
So here comes Windows 7.
I cannot install 64bit but I really wanted to take advantage of 4GB RAM and 64bit is the way to go anyway.
I installed Windows 7 RC? and then downloaded vpc rc and windows xp mode rc.
When I tried to create a new VM or wanted to start XP Mode only an ERROR messages was displayed and I shall check my cpu and enable virtualization. As I said this model from Acer does not allow this and I haven't found out how to hack the bios settings to enable this.
But Virtualbox just works fine and I don't care about all that speed, my need is just to get windows xp for certain old applications.
Next thing I now is that I have to try to use the Windows XP Mode vhd to boot up in Virtualbox.
1) C:\program files\windows xp mode rc\.vhd
2) elevated cmd prompt: takeown c:\.......vhd
3) icacls ......vhd /grant myuser:F
4) remove read only attribute of file
5) start the virtualbox and create a new machine, import .vhd to library first and then start it
a mini setup will run
and ask you all the regular questions.
Also in my case it asked for a video driver and base system. Cancel those.
The system is then ready and only the 2 drivers mentioned before show up in devmgmt.msc as not correctly installed.
Internet works from the start. Machine looks to be fully funtional. (Virtualbox 3.0.6 used).
side note: I can only hope that the guys from virtualbox make a better seamless mode it's not nice, missing is the integration like in fusion, parallels or vpc.
After this I tried guest additions and since I felt really great I enabled the 3D accelation for fun. (Did a snapshot before that).
Worked like a charm. The only thing was to click enter when asked for administrator password which I left blank intentionally.
Ok, now activation. I DOESN't work. it did not accept it. there is a key provided in the machine and since the hardware changed you'll need to activate it and this seems to break and the key is then gone.
Update: I just switched back to my snapshot and did not install anything and tried to install updates. no luck either. Activation does not go through.
Good that they did this, bad for those people like me that bought a stupid machine where VT cannot be enabled.
When I bought that notebook I especially took care that the processor I buy has the features for x64 and vt but no one mentioned that the bios has to have this setting. I did not think that it should not be there because on my thinkpad the settings were always there.
Ok. Now maybe has another solution to my problem. running vpc without vt would be ok or getting that bios fixed.
;(
2009-08-28
VirtualBox: Boot from a USB Drive (stick or disk) !!
I found this and it saved my day!
Boot your USB Drive in VirtualBox
http://agnipulse.com/2009/07/boot-your-usb-drive-in-virtualbox/
Boot your USB Drive in VirtualBox
http://agnipulse.com/2009/07/boot-your-usb-drive-in-virtualbox/
mac os x 10.6: boot from usb
I always like to play around and I hate CDs etc. That's the reason I took an .iso of the dvd and restored it onto a usb diskdrive and restarted the computer while holding down alt(option) key and selected that usb disk.
everything is fine. mac os is now even better than before and the price is more than right. The best feature is the dock and gallery view with scrolling and folder traversing.
BTW: The .iso must be on a mac formated disk, mounted (by double clicking) and then using the disk utility can be restored to the usb disk. But you'll have to drag the mounted iso to source and select the usb disk. somehow I always forget to do that and it takes a few minutes until I realize I need to do it this way.
Have fun.
everything is fine. mac os is now even better than before and the price is more than right. The best feature is the dock and gallery view with scrolling and folder traversing.
BTW: The .iso must be on a mac formated disk, mounted (by double clicking) and then using the disk utility can be restored to the usb disk. But you'll have to drag the mounted iso to source and select the usb disk. somehow I always forget to do that and it takes a few minutes until I realize I need to do it this way.
Have fun.
Unix Bash: test if file or directory exists
test -e test.txt
test -d dir
if [ -d dir ]
-a file
True if file exists.
-b file
True if file exists and is a block special file.
-c file
True if file exists and is a character special file.
-d file
True if file exists and
is a directory.
-e file
True if file exists.
-f file
True if file exists and is a regular file.
-g file
True if file exists and is set-group-id.
test -d dir
if [ -d dir ]
-a file
True if file exists.
-b file
True if file exists and is a block special file.
-c file
True if file exists and is a character special file.
-d file
True if file exists and
is a directory.
-e file
True if file exists.
-f file
True if file exists and is a regular file.
-g file
True if file exists and is set-group-id.
Unix Bash: replace trailing / from string
a="dir/"
echo ${a%*/}
replace within string
a="awordb"
echo ${a//word/dog}
echo ${a%*/}
replace within string
a="awordb"
echo ${a//word/dog}
2009-08-27
outlook sync with google calendar and then import into iphone
Getting started with Google Calendar SyncPrint OverviewIntroductionGet StartedSync OptionsCopyright NoticesTroubleshooting
To set up Google Calendar Sync:
1.Make sure you're using a supported operating system and Outlook version.
2.Download Google Calendar Sync (version 0.9.3.5) at http://dl.google.com/googlecalendarsync/GoogleCalendarSync_Installer.exe
3.Once a dialog box appears, click Save File. The downloaded file should open automatically. If it doesn't, manually open it from your browser's download window.
4.Click OK to confirm that you're aware this is an executable file.
5.Read through the Google Calendar Sync Terms of Service, and click I Agree.
6.Follow through the Installation Options and click Install to finish the set-up process.
Once Google Calendar Sync is installed on your computer, the Google Calendar Sync Settings window will appear:
Google Sync: Set Up Your iPhone or iPod TouchPrint
To set up Google Sync on your iPhone or iPod Touch device, please follow the steps below for the OS version that you're running.
OS Version 2.2.x
Requirements and Upload1. Make sure your device has firmware version 2.2 or 2.2.1. You can check your current version by going to Settings > General > About > Version. Google Sync won't work on earlier versions of the firmware.
To upgrade, follow the instructions at http://www.apple.com/iphone/softwareupdate/. If your iPhone or iPod has firmware version 3.0, it's important that you follow different setup instructions.
2. Upload any Contacts and Calendars from your phone to your computer before proceeding. The iPhone will delete Contacts and Calendars during setup.
Learn how to upload your Contacts with iTunes: Instructions for PC - Instructions for Mac
3. The contacts that are replaced on your device will be the contents of your My Contacts group. This is the only group supported at this time, so make sure to clean up your My Contacts before syncing.
Tip: If you have a Mac, make sure that Synchronize with Google in the Address Book app is OFF. Otherwise all of your contacts will sync to Address Book.
Note: Mail sync is not yet supported. You may receive error messages if you attempt to turn on Sync for Mail. Getting Started1. Open the Settings application on your device's home screen.
2. Open Mail, Contacts, Calendars.
3. Tap Add Account....
4. Select Microsoft Exchange.
Enter Account Info5. In the Email field, enter your full Google Account email address. If you use an @googlemail.com address, you may see an "Unable to verify certificate" warning when you proceed to the next step.
6. Leave the Domain field blank.
7. Enter your full Google Account email address as the Username.
8. Enter your Google Account password as the Password.
9. Tap Next at the top of your screen.
10. A new Server field will appear. Enter m.google.com.
11. Press Next at the top of your screen again.
12. Select the Google services you want to sync. Currently only Contacts and Calendar are supported.
Make sure that you have uploaded your data before proceeding.
13. Press Sync twice when warned about data loss.
You've set up Google Sync for your iPhone. Synchronization will begin automatically if you have Push enabled on your phone. You can also open the Calendar or Contacts app and wait a few seconds to start a sync.
Next, learn how to choose which calendars to sync, if you'd like to enable multiple calenders.
Tip: If your business, school, or organization uses Google Apps, your administrator will first need to enable Google Sync before you can take advantage of this feature.
OS Version 3.0
Requirements and Upload
1. Make sure your device has version 3.0 firmware or above. You can check your current version by going to Settings > General > About > Version. To upgrade, follow the instructions at http://www.apple.com/iphone/softwareupdate/.
2. Perform a sync with iTunes to ensure that Contacts and Calendars from your iPhone are backed up to your computer.
Note: Mail sync is not yet supported. You may receive error messages if you attempt to turn on Sync for Mail.
Getting Started
1. Open the Settings application on your device's home screen.
2. Open Mail, Contacts, Calendars.
3. Tap Add Account....
4. Select Microsoft Exchange.
Enter Account Info
5. In the Email field, enter your full Google Account email address. If you use an @googlemail.com address, you may see an "Unable to verify certificate" warning when you proceed to the next step.
6. Leave the Domain field blank.
7. Enter your full Google Account email address as the Username.
8. Enter your Google Account password as the Password.
9. Tap Next at the top of your screen.
9a. Choose Accept if the Unable to Verify Certificate dialog appears.
10. A new Server field will appear. Enter m.google.com.
11. Press Next at the top of your screen again.
12. Select the Google services you want to sync. Currently only Contacts and Calendar are supported.
13. Unless you want to delete all the existing Contacts and Calendars on your phone, select the Keep on my iPhone option when prompted. This will also allow you to keep syncing with your computer via iTunes.
You've set up Google Sync for your iPhone. Synchronization will begin automatically if you have Push enabled on your phone. You can also open the Calendar or Contacts app and wait a few seconds to start a sync.
Next learn how to choose which calendars to sync, if you'd like to enable multiple calenders.
Tip: If your business, school, or organization uses Google Apps, your administrator will first need to enable Google Sync before you can take advantage of this feature.
To set up Google Calendar Sync:
1.Make sure you're using a supported operating system and Outlook version.
2.Download Google Calendar Sync (version 0.9.3.5) at http://dl.google.com/googlecalendarsync/GoogleCalendarSync_Installer.exe
3.Once a dialog box appears, click Save File. The downloaded file should open automatically. If it doesn't, manually open it from your browser's download window.
4.Click OK to confirm that you're aware this is an executable file.
5.Read through the Google Calendar Sync Terms of Service, and click I Agree.
6.Follow through the Installation Options and click Install to finish the set-up process.
Once Google Calendar Sync is installed on your computer, the Google Calendar Sync Settings window will appear:
Google Sync: Set Up Your iPhone or iPod TouchPrint
To set up Google Sync on your iPhone or iPod Touch device, please follow the steps below for the OS version that you're running.
OS Version 2.2.x
Requirements and Upload1. Make sure your device has firmware version 2.2 or 2.2.1. You can check your current version by going to Settings > General > About > Version. Google Sync won't work on earlier versions of the firmware.
To upgrade, follow the instructions at http://www.apple.com/iphone/softwareupdate/. If your iPhone or iPod has firmware version 3.0, it's important that you follow different setup instructions.
2. Upload any Contacts and Calendars from your phone to your computer before proceeding. The iPhone will delete Contacts and Calendars during setup.
Learn how to upload your Contacts with iTunes: Instructions for PC - Instructions for Mac
3. The contacts that are replaced on your device will be the contents of your My Contacts group. This is the only group supported at this time, so make sure to clean up your My Contacts before syncing.
Tip: If you have a Mac, make sure that Synchronize with Google in the Address Book app is OFF. Otherwise all of your contacts will sync to Address Book.
Note: Mail sync is not yet supported. You may receive error messages if you attempt to turn on Sync for Mail. Getting Started1. Open the Settings application on your device's home screen.
2. Open Mail, Contacts, Calendars.
3. Tap Add Account....
4. Select Microsoft Exchange.
Enter Account Info5. In the Email field, enter your full Google Account email address. If you use an @googlemail.com address, you may see an "Unable to verify certificate" warning when you proceed to the next step.
6. Leave the Domain field blank.
7. Enter your full Google Account email address as the Username.
8. Enter your Google Account password as the Password.
9. Tap Next at the top of your screen.
10. A new Server field will appear. Enter m.google.com.
11. Press Next at the top of your screen again.
12. Select the Google services you want to sync. Currently only Contacts and Calendar are supported.
Make sure that you have uploaded your data before proceeding.
13. Press Sync twice when warned about data loss.
You've set up Google Sync for your iPhone. Synchronization will begin automatically if you have Push enabled on your phone. You can also open the Calendar or Contacts app and wait a few seconds to start a sync.
Next, learn how to choose which calendars to sync, if you'd like to enable multiple calenders.
Tip: If your business, school, or organization uses Google Apps, your administrator will first need to enable Google Sync before you can take advantage of this feature.
OS Version 3.0
Requirements and Upload
1. Make sure your device has version 3.0 firmware or above. You can check your current version by going to Settings > General > About > Version. To upgrade, follow the instructions at http://www.apple.com/iphone/softwareupdate/.
2. Perform a sync with iTunes to ensure that Contacts and Calendars from your iPhone are backed up to your computer.
Note: Mail sync is not yet supported. You may receive error messages if you attempt to turn on Sync for Mail.
Getting Started
1. Open the Settings application on your device's home screen.
2. Open Mail, Contacts, Calendars.
3. Tap Add Account....
4. Select Microsoft Exchange.
Enter Account Info
5. In the Email field, enter your full Google Account email address. If you use an @googlemail.com address, you may see an "Unable to verify certificate" warning when you proceed to the next step.
6. Leave the Domain field blank.
7. Enter your full Google Account email address as the Username.
8. Enter your Google Account password as the Password.
9. Tap Next at the top of your screen.
9a. Choose Accept if the Unable to Verify Certificate dialog appears.
10. A new Server field will appear. Enter m.google.com.
11. Press Next at the top of your screen again.
12. Select the Google services you want to sync. Currently only Contacts and Calendar are supported.
13. Unless you want to delete all the existing Contacts and Calendars on your phone, select the Keep on my iPhone option when prompted. This will also allow you to keep syncing with your computer via iTunes.
You've set up Google Sync for your iPhone. Synchronization will begin automatically if you have Push enabled on your phone. You can also open the Calendar or Contacts app and wait a few seconds to start a sync.
Next learn how to choose which calendars to sync, if you'd like to enable multiple calenders.
Tip: If your business, school, or organization uses Google Apps, your administrator will first need to enable Google Sync before you can take advantage of this feature.
mac os x - apache2 - webpages
look at
http://www.devarticles.com/c/a/Apache/Using-Apache-and-PHP-on-Mac-OS-X/
o start Apache WebServer
, you must go into the “System Preferences Control panel located on the “Apple Menu”.
Click on the Icon labeled "Sharing". Then locate the tab labeled "File & Web". You will want to click the button labeled “Start” in the "Web Sharing " section. This starts up Web sharing which starts the Apache Web Server.
Apache Web Server is now running. Easy, huh? "How can I tell?” you ask. Simple. Start up your web browser of choice. In the web address or URL part of your browser, type: "localhost" (without the double-quotes)
Ex. http://localhost
If everything is Okay, your browser will display the following:
"If you can see this, it means that the installation of the Apache Web server software on this system was successful. You may now add content to this directory and replace this page."
It worked! Hooray.
To access the pages of this directory, double-click on your hard drive and locate the "Library" directory. From there locate the "WebServer" directory and then the "Documents" directory where these web pages reside.
Note: If its not running, you either do not have web sharing enabled or something is wrong with Apache's files. It should work right out of the box.
Since Mac OS X is a multi-user system, every person has their own account and with that brings it’s own set of web pages. To access your personal web pages you must type the following in the browser address:
Ex. http://localhost/~yourname/
To access your personal web pages, locate your account name directory under "Users" And locate the directory labeled "Sites".
/Users/yourname/Sites/your web pages are here <---
http://www.devarticles.com/c/a/Apache/Using-Apache-and-PHP-on-Mac-OS-X/
o start Apache Web
Click on the Icon labeled "Sharing". Then locate the tab labeled "File & Web". You will want to click the button labeled “Start” in the "Web Sharing " section. This starts up Web sharing which starts the Apache Web Server.
Apache Web Server is now running. Easy, huh? "How can I tell?” you ask. Simple. Start up your web browser of choice. In the web address or URL part of your browser, type: "localhost" (without the double-quotes)
Ex. http://localhost
If everything is Okay, your browser will display the following:
"If you can see this, it means that the installation of the Apache Web server software on this system was successful. You may now add content to this directory and replace this page."
It worked! Hooray.
To access the pages of this directory, double-click on your hard drive and locate the "Library" directory. From there locate the "WebServer" directory and then the "Documents" directory where these web pages reside.
Note: If its not running, you either do not have web sharing enabled or something is wrong with Apache's files. It should work right out of the box.
Since Mac OS X is a multi-user system, every person has their own account and with that brings it’s own set of web pages. To access your personal web pages you must type the following in the browser address:
Ex. http://localhost/~yourname/
To access your personal web pages, locate your account name directory under "Users" And locate the directory labeled "Sites".
/Users/yourname/Sites/your web pages are here <---
still looking for the best daily log software and what private folders on mac os x
Where are good descriptions for what comes with 10.5.
what is the private folder ?
How to update apache on mac os x?
what is the private folder ?
How to update apache on mac os x?
Excel remove text from the beginning =replace(a1,1,4,"")
Remove the first 4 characters from a string:
1,6,00:00:00:00:00:00
result is
00:00:00:00:00:00
1,6,00:00:00:00:00:00
result is
00:00:00:00:00:00
excel is bad - trailing characters is worse
I had to copy some text from a table in IE to Excel and then use a concatenate() formula.
But the result contained always a trailing space or so it seamed.
But =trim() or =clean() did not remove it.
Thanks to the online help, I found the following which solved my problem:
=TRIM(SUBSTITUTE(A4,CHAR(160),CHAR(32)))
But the result contained always a trailing space or so it seamed.
But =trim() or =clean() did not remove it.
Thanks to the online help, I found the following which solved my problem:
=TRIM(SUBSTITUTE(A4,CHAR(160),CHAR(32)))
apache 2 - beautify directory listings
After a long time I found out:
mod_autoindex is responsible for the generation:
I had to put in the following:
IndexOptions FancyIndexing HTMLTable VersionSort FoldersFirst NameWidth=* SuppressDescription
- Most importantly for me was the NameWidth=*, i.e. automatically size it to the longest name and FoldersFirst so it's like explorer.
IndexStyleSheet "/css/style.css"
- With this I was able to put in a stylesheet and change the font and background
IndexIgnore P*_files components.swf loadflash.js
- This helped to get rid of some files from displaying
mod_autoindex is responsible for the generation:
I had to put in the following:
IndexOptions FancyIndexing HTMLTable VersionSort FoldersFirst NameWidth=* SuppressDescription
- Most importantly for me was the NameWidth=*, i.e. automatically size it to the longest name and FoldersFirst so it's like explorer.
IndexStyleSheet "/css/style.css"
- With this I was able to put in a stylesheet and change the font and background
IndexIgnore P*_files components.swf loadflash.js
- This helped to get rid of some files from displaying
2009-08-25
Convert vmware machine to virtualbox 3.x
Today I found a nice vmware appliance that was only available as a vmware image. But I dissed vmware server and workstation a long time ago (except fusion) and try to make use of virtualbox.
But virtualbox lacks a lot of things but this is how I was able to move that appliance to virtualbox:
1) the appliance came with the following files:
.nvram
.vmdk
.vmsd
.vmx
.vmxf
2) I started virtualbox and imported the .vmdk
This is really great: Virtualbox can handle .vmdk natively!
3) I opened the .vmx in an editor (for me that means vim) and extracted:
scsi0.virtualDev = "lsilogic"
guestOS = "other26xlinux"
memsize = "512"
4) I created (wizard) a new virtualbox machine using:
Linux, Linux 2.6
512MB ram
use existing harddisk, that's where I choose the disk that I imported in step 2
5) Just for fun I started the machine without changing any settings (like SCSI etc.)
I left all the other settings at default and started the machine, but it crashed:
unkown interrupt or fault at EIP 000000060 c0100295 00000294
and that messages appeared endlessly.
I could not see the previous messages besides uncompressing linux ..... it was too fast.
6) I stopped the machine using HOST+Q then select stop
7) Ok now here come the changes that I should have done before, but I list them here in separate steps.
7.1 Under System -> Processor: check -> Enable PAE/NX
This fixed the unknown interrupt message thing (but the machine would still reboot after the inital steps)
7.2 Under Hard Disks -> Enable Additional Controller->SCSI(Lsilogic)
7.3 and change the attachments-> Slot -> to SCSI Port 0
Now I was able to boot and the system started nicely. But no network!!!
8) vmxnet: Device in slot 0000:00:03.0 is not supported by this driver.
vmxnet: probe of 0000:00:03.0 failed with error -16
Now I immediately new that was bad news and I had to try to get this machine to accept the new network adapter.
The default adapter that virtualbox 3.04 on my machine at least:
PCnet-FAST III (NAT)
I read on a webpage that Intel PRO/1000 MT Desktop would be a better choice.
So I changed it to Network ->Adapter 1-> Adapter Type: Intel PRO/1000 MT Desktop (8254OEM), NAT was ok for me.
9) Still no networking, eth0: error fetching interface information: Device not found
Ok, now I did not really now what kind of distribution it was and I needed to have a look at the network config etc.
9.1) I saw that it was Grub but it looks like it has a timeout=0, because it only displayed the menu very very quickly.
I have not found out how to stop Grub from continuing. Even after 10 times of Host+R
Hitting escape as it was said here did not work:
Occasionally, GRUB requires some simple intervention. Perhaps a new kernel isn’t working correctly with your system or maybe you want to bring the system into a different runlevel than the default. Hit the ESCAPE key to interrupt the GRUB countdown and bring up GRUB’s main menu.
Maybe someone knows how to stop that thing.
9.2) Ok to access the files I used ubuntu-9.04-desktop live iso cd which I added to virtualbox library and then under CD/DVD-ROM -> mount -> iso image file -> ubuntu-9.04-desktop-i386.iso
9.3) I quickly checked the boot order under System->Motherboard->Boot Order and noticed that the default is Floppy-CD/DVD-ROM-HardDisk-Network. That was fine.
10) Live ISO cd running and with ubuntu I just clicked on Places->Home Folder and selected the 4GB Disk it listed. This mounted the hard disk as /media/disk read/write and I did not even have to search for which disk and what parameters to use mount with
11) Using the terminal I checked if there is a configuration like on red hat or on debian but it was not!
12) In /etc/modprobe.conf I found the following statement:
alias eth0 vmxnet
this I changed into
alias eth0 e1000
13) I also changed /boot/grub/menu.lst timeout=30 just so I can enter single user mode
But on that machine I could not just add Single at the end of kernel but had to use init=/bin/bash
Finally, the vmware appliance ran on virtualbox!!!
But virtualbox lacks a lot of things but this is how I was able to move that appliance to virtualbox:
1) the appliance came with the following files:
.nvram
.vmdk
.vmsd
.vmx
.vmxf
2) I started virtualbox and imported the .vmdk
This is really great: Virtualbox can handle .vmdk natively!
3) I opened the .vmx in an editor (for me that means vim) and extracted:
scsi0.virtualDev = "lsilogic"
guestOS = "other26xlinux"
memsize = "512"
4) I created (wizard) a new virtualbox machine using:
Linux, Linux 2.6
512MB ram
use existing harddisk, that's where I choose the disk that I imported in step 2
5) Just for fun I started the machine without changing any settings (like SCSI etc.)
I left all the other settings at default and started the machine, but it crashed:
unkown interrupt or fault at EIP 000000060 c0100295 00000294
and that messages appeared endlessly.
I could not see the previous messages besides uncompressing linux ..... it was too fast.
6) I stopped the machine using HOST+Q then select stop
7) Ok now here come the changes that I should have done before, but I list them here in separate steps.
7.1 Under System -> Processor: check -> Enable PAE/NX
This fixed the unknown interrupt message thing (but the machine would still reboot after the inital steps)
7.2 Under Hard Disks -> Enable Additional Controller->SCSI(Lsilogic)
7.3 and change the attachments-> Slot -> to SCSI Port 0
Now I was able to boot and the system started nicely. But no network!!!
8) vmxnet: Device in slot 0000:00:03.0 is not supported by this driver.
vmxnet: probe of 0000:00:03.0 failed with error -16
Now I immediately new that was bad news and I had to try to get this machine to accept the new network adapter.
The default adapter that virtualbox 3.04 on my machine at least:
PCnet-FAST III (NAT)
I read on a webpage that Intel PRO/1000 MT Desktop would be a better choice.
So I changed it to Network ->Adapter 1-> Adapter Type: Intel PRO/1000 MT Desktop (8254OEM), NAT was ok for me.
9) Still no networking, eth0: error fetching interface information: Device not found
Ok, now I did not really now what kind of distribution it was and I needed to have a look at the network config etc.
9.1) I saw that it was Grub but it looks like it has a timeout=0, because it only displayed the menu very very quickly.
I have not found out how to stop Grub from continuing. Even after 10 times of Host+R
Hitting escape as it was said here did not work:
Occasionally, GRUB requires some simple intervention. Perhaps a new kernel isn’t working correctly with your system or maybe you want to bring the system into a different runlevel than the default. Hit the ESCAPE key to interrupt the GRUB countdown and bring up GRUB’s main menu.
Maybe someone knows how to stop that thing.
9.2) Ok to access the files I used ubuntu-9.04-desktop live iso cd which I added to virtualbox library and then under CD/DVD-ROM -> mount -> iso image file -> ubuntu-9.04-desktop-i386.iso
9.3) I quickly checked the boot order under System->Motherboard->Boot Order and noticed that the default is Floppy-CD/DVD-ROM-HardDisk-Network. That was fine.
10) Live ISO cd running and with ubuntu I just clicked on Places->Home Folder and selected the 4GB Disk it listed. This mounted the hard disk as /media/disk read/write and I did not even have to search for which disk and what parameters to use mount with
11) Using the terminal I checked if there is a configuration like on red hat or on debian but it was not!
12) In /etc/modprobe.conf I found the following statement:
alias eth0 vmxnet
this I changed into
alias eth0 e1000
13) I also changed /boot/grub/menu.lst timeout=30 just so I can enter single user mode
But on that machine I could not just add Single at the end of kernel but had to use init=/bin/bash
Finally, the vmware appliance ran on virtualbox!!!
Linux - what to do if single user mode does not work
I just been through the problem, where I desperately needed root access to a system and could not boot into single user mode.
It uses grub, but the timeout=0, I was able to mount the harddisk and edit the menu.lst under /boot/grub/menu.lst to timeout=30.
Also I added a second entry and put the word "single" behind the kernel line:
kernel /boot/bzImage rw root=/dev/sda1 Single
but when I booted into the system it just booted into Runlevel 3 as usual.
What I had to do is to add init=/bin/bash to that line and then I was accessing the system again.
Update:
You should run:
sync
reboot
but reboot failed!!
there was a message init: timeout opening/writing control channel /dev/initctl
I had to run reboot -f !!
It uses grub, but the timeout=0, I was able to mount the harddisk and edit the menu.lst under /boot/grub/menu.lst to timeout=30.
Also I added a second entry and put the word "single" behind the kernel line:
kernel /boot/bzImage rw root=/dev/sda1 Single
but when I booted into the system it just booted into Runlevel 3 as usual.
What I had to do is to add init=/bin/bash to that line and then I was accessing the system again.
Update:
You should run:
sync
reboot
but reboot failed!!
there was a message init: timeout opening/writing control channel /dev/initctl
I had to run reboot -f !!
2009-07-13
2009-05-16
Windows 7 is not worth talking about
I was so disappointed after hearing so much talk about windows 7 and then experiencing it myself and finding out that it is xp + vista + some changes.
Windows 7 is looking ok. For me it is still to cluttered, the user experience is still not easy enough. The programs and even media center look like 2003. The ribbon for wordpad is 2007.
In the keynote of teched 2009 they said they cannot change to much or you won't be able to recognize and use it. Maybe it should be completely different and mind boggling.
Office 2007 was a nice enjoyable user interface upgrade. I liked most of it and was happy that it was kind of a breakthrough. But Vista and Windows 7, forget it. Stick to windows xp and install the ui extensions and youre all set for the next 4 years!!!!
Don't invest into Windows 7. Use it if you get it for free. Me, I would always love to work with the newest technology and I used Vista since mid november 2007 (after the beta etc.). I appreciate the group policy things, I appreciate a bit a modernization but it should be a revolution now.
Mac OS X is the much better end user experience. It lacks a ton of things but what you get it what you can use (60% functionality there). With Windows I get 85% functionality but I have to install or use 15 additional programs and they don't reall interoperate that well.
So to hell with Windows 7 for now. Let's see if they have something else in petto.
I use now a new MacBook with 10.5.7 and VMWARE Fusion with XP, Vista and Windows 7 in unity mode and I'll love it. I get 90% functionality out of this and Apple and Microsoft is happy or should be since I have to have all licenses from both.
Windows 7 is looking ok. For me it is still to cluttered, the user experience is still not easy enough. The programs and even media center look like 2003. The ribbon for wordpad is 2007.
In the keynote of teched 2009 they said they cannot change to much or you won't be able to recognize and use it. Maybe it should be completely different and mind boggling.
Office 2007 was a nice enjoyable user interface upgrade. I liked most of it and was happy that it was kind of a breakthrough. But Vista and Windows 7, forget it. Stick to windows xp and install the ui extensions and youre all set for the next 4 years!!!!
Don't invest into Windows 7. Use it if you get it for free. Me, I would always love to work with the newest technology and I used Vista since mid november 2007 (after the beta etc.). I appreciate the group policy things, I appreciate a bit a modernization but it should be a revolution now.
Mac OS X is the much better end user experience. It lacks a ton of things but what you get it what you can use (60% functionality there). With Windows I get 85% functionality but I have to install or use 15 additional programs and they don't reall interoperate that well.
So to hell with Windows 7 for now. Let's see if they have something else in petto.
I use now a new MacBook with 10.5.7 and VMWARE Fusion with XP, Vista and Windows 7 in unity mode and I'll love it. I get 90% functionality out of this and Apple and Microsoft is happy or should be since I have to have all licenses from both.
MSI Wind U120 mac os x
It was almost to good to be true but running osx on that little machine is the best thing ever.
Cost of Hardware SFr. 440.00, cost of Software SFr. 180.00. And I have complete OSX Netbook!
Nice.
Cost of Hardware SFr. 440.00, cost of Software SFr. 180.00. And I have complete OSX Netbook!
Nice.
2009-02-15
2009-01-19
iphone is still running
to my surprise the iphone is working great.
I did get rid of the wave case since it made it to big and I want my iphone to be without any case.
But I'd like to apply a kind of a seethrough protection film on the back side since it gets some hicks and they do not look nice. Also I the metal frame gets more and more scratches.
I really like artwizz film, up to now I had to replace 2 films and I still have 1 left from the original package. Great!
The biggest no no is that the iphone lacks a real sip client that I could use in the company and GPS Navigation. i really want to get rid of my axim dell with bluetooth gps and navigon and use the iphone everywhere!
I did get rid of the wave case since it made it to big and I want my iphone to be without any case.
But I'd like to apply a kind of a seethrough protection film on the back side since it gets some hicks and they do not look nice. Also I the metal frame gets more and more scratches.
I really like artwizz film, up to now I had to replace 2 films and I still have 1 left from the original package. Great!
The biggest no no is that the iphone lacks a real sip client that I could use in the company and GPS Navigation. i really want to get rid of my axim dell with bluetooth gps and navigon and use the iphone everywhere!
Virtualisation Hooray
Today is a good day for me. I made progress.
vmware server 2.0
running ubuntu-8.10 - 4 network adapters - ipv4 routing - dhcrelay for all networks
w2k3 server - ms dhcp server - 20 scopes
wxpsp2 and wxpsp3 - clients on different networks
infoblox dns appliance - bridged on one of the physical adapters
Test environment where I can use the same ip range as in production without having to many physical machines around to play.
ipv4 routing was easy
dhcrelay was troublesome but somehow worked. I still don't know why it did not in the first place since I haven't changed the configuration. I set it to listen to all interfaces and did not add any options.
vmware server 2.0
running ubuntu-8.10 - 4 network adapters - ipv4 routing - dhcrelay for all networks
w2k3 server - ms dhcp server - 20 scopes
wxpsp2 and wxpsp3 - clients on different networks
infoblox dns appliance - bridged on one of the physical adapters
Test environment where I can use the same ip range as in production without having to many physical machines around to play.
ipv4 routing was easy
dhcrelay was troublesome but somehow worked. I still don't know why it did not in the first place since I haven't changed the configuration. I set it to listen to all interfaces and did not add any options.
2009-01-09
perl eclipse epic padwalker
Now I am trying to do some perl stuff.
eclipse ganymade
I downloaded eclipse and double clicked on the downloaded file.
The I started eclipse and went over
2008-10-20
2008-10-14
Apple ohne Patch für DNS-Lücke
http://www.heise.de/security/Apple-ohne-Patch-fuer-DNS-Luecke--/news/meldung/113383
Anhörung zu DNSSEC-Schlüssel - ICANN greift nach DNS-Kontrolle
http://www.heise.de/newsticker/Anhoerung-zu-DNSSEC-Schluessel-ICANN-greift-nach-DNS-Kontrolle--/meldung/117161
2008-10-13
Customize Windows/Office Save As Dialog
Ok I found the termology:
Places Bar - Windows XP, Office XP, 2003, 2007
Favorite Links - Windows Vista
Since I have to go through the save as dialog a thousand times per month I decided to search for a solution to modify the dialog and have found:
Solution was Office 2003:
vista - http://support.microsoft.com/kb/926167
windows xp - http://www.simplehelp.net/2007/07/28/how-to-set-custom-shortcuts-in-the-windows-xp-save-as-dialog-box/
Office - http://support.microsoft.com/kb/826214/en-us
I will check if this helps.
Places Bar - Windows XP, Office XP, 2003, 2007
Favorite Links - Windows Vista
Since I have to go through the save as dialog a thousand times per month I decided to search for a solution to modify the dialog and have found:
Solution was Office 2003:
- In Word click on Save as...->
- Then select the folder you would like to add to the places bar,
- then choose from the tools menu (upper right corner on the dialog) add to "My Places"
- And since I want mine to appear topmost I have to select it and click a few times move up
vista - http://support.microsoft.com/kb/926167
windows xp - http://www.simplehelp.net/2007/07/28/how-to-set-custom-shortcuts-in-the-windows-xp-save-as-dialog-box/
Office - http://support.microsoft.com/kb/826214/en-us
I will check if this helps.
2008-09-23
finally some portable software that I really like - gpass portable
http://www.teknobites.com/2008/09/23/access-hulu-pandora-outside-usa-with-gpass
2008-09-10
Oh, no I violated my rule of no software installation
Bye, bye.
I installed software on my vista and I have to reinstall the machine.
I just wanted to try out something (synctoy 2.0) and also I installed teamviewer host. OK. That means reinstallation is under way.
Just starting now.
2008-09-09
Vista September Updates - here we go
ok let's see what microsoft has in petto for us:
UPDATE: Install KB938464
ok let's see what microsoft has in petto for us:
UPDATE: Install KB938464!
2x security updates
KB938464
Microsoft Security Bulletin MS08-052 – Critical
Vulnerabilities in GDI+ Could Allow Remote Code Execution (954593)
GDI+ VML Buffer Overrun Vulnerability - CVE-2007-5348
GDI+ EMF Memory Corruption Vulnerability - CVE-2008-3012
GDI+ GIF Parsing Vulnerability - CVE-2008-3013
GDI+ WMF Buffer Overrun Vulnerability - CVE-2008-3014
GDI+ BMP Integer Overflow Vulnerability - CVE-2008-3015
KB954154
Microsoft Security Bulletin MS08-054 – Critical
Vulnerability in Windows Media Player Could Allow Remote Code Execution (954154)
This security update resolves a privately reported vulnerability in Windows Media Player that could allow remote code execution when a specially crafted audio file is streamed from a Windows Media server
The security update addresses the vulnerability by correcting the manner in which Windows Media Player 11 handles audio files streamed from a server-side playlist (SSPL)
This vulnerability can only be exploited via the Real Time Streaming Protocol (RTSP). Organizations that do not allow RTSP inbound from the Internet are at reduced risk from this vulnerability. For more information on the ports used by RTSP, refer to Microsoft Knowledge Base Article 827562
Unregister wmpeffects.dllTo unregister this DLL, run the following command from an elevated command prompt:
•
For 32-bit Windows-based systems:Regsvr32.exe –u %WINDIR%\system32\wmpeffects.dll
•
For 64-bit Windows-based systems:Regsvr32.exe –u %WINDIR%\syswow64\wmpeffects.dll
•
Impact of workaround: Visualizations will fail to display in the Now Playing view of Windows Media Player.
1x update for vista
KB955302
Improvements to the stability of Windows Vista SP1-based or Windows Server 2008-based computers that use Windows ReadyBoost technology.
Improvements to the performance of wireless adapters when you switch between preferred networks after the computer resumes from hibernation.
New functionality to prevent a data loss scenario when certain registry keys are missing while the Microsoft Disk Cleanup tool is running.
Improvements to system reliability when Group Policy settings and SMB signing are used.
Improvements to the stability of systems on which Nvidia graphics cards are installed.
1x malicious software removal tool
Wow, it recognises 1 new malicious software:
Win32/Slenfbot (http://go.microsoft.com/fwlink/?linkid=37020&name=Win32/Slenfbot)
September 2008 (V 2.2)
Moderate
1x junk
kb link goes to a very old reviewed article == junk
1x update for vista (recommended)
Update for Windows Vista (KB954366)
More information: http://support.microsoft.com/kb/954366
This is application compatibility update
The KB article is from august 12th and not from september and it specifies
sqlserver 2005
.net framework 3.5
and a hard block on some "saming one key recovery 5"
BTW: Have I told you lately that blogger.com editing is crap. Simple as that. Not usable.
2008-09-05
Google chrome with flash plugin. Done!!!!
Thanks cashy and thanks the hypernation.
1) get google chrome from from cashy
2) unzip with peazip or some other software
3) get the .xpi file from hypernation
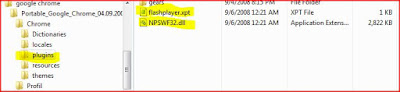
4) rename .xpi to .zip and get flashplayer.xpt and NPSWF32.dll (as described by the hypernation)
5) put the xpt and dll into the folder plugins (Chrome\plugins), e.g. d:\@tools\google chrome\portable_google_chrome\Chrome\plugins
6) restart chrome portable and voila it's done.
7) Please create a package and upload it somewhere with the plugin loaded
8) I don't know about licensing. Is it allowed to bundle adobe flash with google chrome?
Probably not. Anybody know for sure?
google chrome from usb stick: flash plugin missing
Ok, thanks to cashy I can use google chrome without installing but I need the flash player or the browsing experience is only half the fun.
I found on another blog that it can be done but I don't know yet if I can integrate into google chrome portable.
I found a new hero - Carsten Knoblauch - Update: not really a hero to use .exe and no sha1 hash!!!
On his webpage there is a link and you'll be able to download an .exe!! not good. But I'll try to extract it with 7-zip or delete it again. Note: 7-zip started from usb stick.
As I've told you I am not going to install software, no way. Did I mention for ever ever before?
Anyway, I use about 100 tools from USB Stick. Not U3 (shame on you), not portableapps, though not bad.
And this is just what I need. Google Chrome without installing!
I still have to check what I do about the flash plugin for IE7 or IE8. But I can resist for now.
So here is my 101 Tool
http://stadt-bremerhaven.de/2008/09/03/portable-chrome-021510/
I'll list all my tools in a while. I counted all sysinternals suite tools to be part of the 100 so it is really not so much.
As I've told you I am not going to install software, no way. Did I mention for ever ever before?
Anyway, I use about 100 tools from USB Stick. Not U3 (shame on you), not portableapps, though not bad.
And this is just what I need. Google Chrome without installing!
I still have to check what I do about the flash plugin for IE7 or IE8. But I can resist for now.
So here is my 101 Tool
http://stadt-bremerhaven.de/2008/09/03/portable-chrome-021510/
I'll list all my tools in a while. I counted all sysinternals suite tools to be part of the 100 so it is really not so much.
Always good to know - Vista clean boot
Here is an article that I think is useful. But to be honest it is known by everyone but seldomly done when needed.
http://support.microsoft.com/kb/929135/en-us
Step 1: Perform a clean boot
a.
Log on to the computer by using an account that has administrator rights.
b.
Click Start, type msconfig.exe in the Start Search box, and then press ENTER to start the System Configuration Utility. If you are prompted for an administrator password or for confirmation, type your password, or click Continue.
c.
On the General tab, click Selective Startup, and then click to clear the Load startup items check box. (The Use Original Boot.ini check box is unavailable.)
d.
On the Services tab, click to select the Hide all Microsoft services check box, and then click Disable all.Note Following this step lets Microsoft services continue to run. These services include Networking, Plug and Play, Event Logging, Error Reporting, and other services. If you disable these services, you may permanently delete all restore points. Do not do this if you want to use the System Restore utility together with existing restore points.
e.
Click OK, and then click Restart.
http://support.microsoft.com/kb/929135/en-us
Step 1: Perform a clean boot
a.
Log on to the computer by using an account that has administrator rights.
b.
Click Start, type msconfig.exe in the Start Search box, and then press ENTER to start the System Configuration Utility. If you are prompted for an administrator password or for confirmation, type your password, or click Continue.
c.
On the General tab, click Selective Startup, and then click to clear the Load startup items check box. (The Use Original Boot.ini check box is unavailable.)
d.
On the Services tab, click to select the Hide all Microsoft services check box, and then click Disable all.Note Following this step lets Microsoft services continue to run. These services include Networking, Plug and Play, Event Logging, Error Reporting, and other services. If you disable these services, you may permanently delete all restore points. Do not do this if you want to use the System Restore utility together with existing restore points.
e.
Click OK, and then click Restart.
2008-09-04
Problem report
Ok so I did look at the report (which I have really not asked for).
And it was really bad, I expected Microsoft to provide me with drivers for this thing as it automatically did for ENE SD and MS card reader. But it displayed a useless message, because I am not going to acer's webpage and download something.
Problem Report
Windows Update has a problem
It showed again that an update is available but it isn't. It also displayed an error message once.
I then rebooted and saw for a very brief moment a registry key being displayed before the vista sign.
I then pressed windows update and search a couple times and it displayed no new updates.
But I have a new process running:
TrustedInstaller.exe - this must be really trustworthy!
I then rebooted and saw for a very brief moment a registry key being displayed before the vista sign.
I then pressed windows update and search a couple times and it displayed no new updates.
But I have a new process running:
TrustedInstaller.exe - this must be really trustworthy!
Windows Update done but I cannot see it in the history
Update Extravaganza
Before I can continue my current blog about new processes I tried to find the screen with the proposed solution for my mmc reader.
And since I had no clue where to look for it I went to windows update and what do you thing windows told me???
Another update to be able to look for updates!!
So am I going to update or continue with the previous blog.
DECISSION: I update since I will be able to find out if a new service or process is running.
Is somebody spying on me? Vista wants to solve a problem I did not know
Ok, so when I was writing the last blog there came a popup saying windows has a solution for me.
I did not notice any problem yet but have seen in device manager that there was one thing not installed.
Why did they send a notice. Have I agreed somewhere that I want to send out information?
Hey Microsoft why do you know about this?????
Are you listening? Am I getting paranoid?
At least Microsoft proposed to install the update I needed, it is a mmc card reader software.
I clicked the screen away and now I cannot open it again.
This is why Vista sucks. So many different places and really difficult to find all things.
New processes 1: Yeah, I knew it. Slowdown already seems happening.
After the 4 Updates are installed there are new processes and services:
There are some many new processes so I had to split this post.


There are some many new processes so I had to split this post.
- conime.exe - This has to do with input, I believe. It is not always here, so maybe it came with me trying out TablePC Input
- hkcmd.exe - no idea. this is permanent.
- update: Hotkey Command Module (Hkcmd.exe) (Microsoft KB 813200)
- igfxper.exe - intel graphics
- igfxsrvc.exe -
- igfxtray.exe - Intel Graphics Tray (Igfxtray.exe)
- I know what tray is because I can see the icon ->
Update:
- hkcmd.exe
- igfxpers.exe
- igfxsrvc.exe
- igfxtray.exe
All of these are from Intel!
these utilities are part of the Intel 82810 Graphics Contoller or the Intel 82815 Graphics Controller (from KB 813200) -> so they are also part of Mobile 945!
- SearchFilterHost.exe - microsoft search related? (searchindexer.exe)
- SearchProtocolHost.exe
These processes only come up sporadically!
Vista is fast! Does not use a lot ressources!
But 1 word of warning do not install anything.
This is also true for the acer software. No need. It works much better without.
I installed 4 updates:
This is also true for the acer software. No need. It works much better without.
I installed 4 updates:
- Malicious Software Removal Tool - Update August
- Network Hardware
- Graphics Hardware
- CXT - Network -HDAudio, soft modem
System is still running smoothly. But for how long?
42 Updates - what the heck
Here we go:
42 Udpates:
42 Udpates:
- 1x Network Hardware
- 1x Graphics Hardware
- 1x HDAUDIO, fax modem and smartCP ???? Some chip? that has hdaudio,fax?
- 1x Group Policy Preference Client Side ? What does it really do? I know it has to do when the client processes the group policies ?
Ultimate Extras
- BitLocker and EFS enhancements?
- Hold Em Poker Game? this is sure not an extra.
- Windows Dream Scene. A nice feature but hey everybody should have this
- Windows Sound Schemes? Beam me up, Scotty?
So now, the best part:
34x language packs
What can I really do with this? Is this MUI, i.e. the complet UI?
1x important update - is this really nice
Update fiasco - After 27 (28) Updates I still have a lot of things I could add
Subscribe to:
Posts (Atom)